
Whether you are starting out with an allotment for the first time or looking for new ways to deal with the waste produced from your plot, we have put together some helpful ideas below. Finding ways to recycle and compost more of our waste has never been more important, especially since the 30th April 2019 when Richmond Council banned bonfires at all allotment sites.
What to do with … branches and twigs
1. Dead Hedging
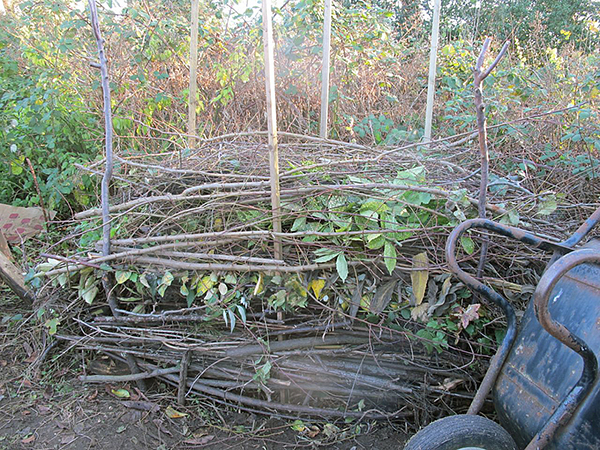
Photo credit: Royal Paddocks Allotments, Hampton Wick
This is a barrier made from branches, foliage and saplings that have been cut down. Throughout the year when you are pruning trees and shrubs or digging up saplings, this waste can be used to make a dead hedge on the boundary of your plot. They are also an excellent habitat for wildlife encouraging species such as beetles and amphibians that will reduce the number the pests, including slugs and aphids, on your plot. It also avoids having to transport large amounts of material to the refuse centre in Richmond, reducing your carbon footprint.

Photo credit: Royal Paddocks Allotments, Hampton Wick
Here is a short 2 minute video guide on how to start building a dead hedge from Wilderness Tamed. Don’t forget you can continue to add to your dead hedge over the years with more material as it rots down.
Alternatively if you don’t have space for a dead hedge or accumulate too much material over time and are unable to remove the waste yourself then any woody material can be temporarily stored at the back of the plot. Periodically, Richmond Council will bring a shredder to each of the allotment sites to shred and remove this accumulated material.
2. Composting
The RHS provides a good guide on basic composting along with a video on exactly what to do. They also provide this Masterclass in composting with lots of tips, which you can download for free.

Photo credit: Telegraph
There are plenty of tutorials online with step-by-step guides on building your own wooden compost. Here is a video from GrowVeg about using old pallets to create your compost bin or alternatively new/reclaimed wood with a tutorial and list of all materials need from Good Housekeeping.

Photo credit: RHS composting for schools
Alternatively some council schemes run projects where you can buy discounted plastic compost bins. Here is a link to a list of what is available from Richmond Council. It’s also worth looking online at websites such as Freecycle, Preloved and Gumtree, where people often give them away for free if you are able to collect.
East Sheen allotments occasionally receive a small amount of rotted material from Richmond Park, which is available to plot holders for free from the Hertford Avenue site. Unfortunately we do not know when this will be delivered so aren’t able to provide notice in advance.
3. DIY Natural Plant Supports

Use shrub clipping and branches from tree pruning to create your own natural (and free!) supports for vegetables. These are ideal for growing vegetables such as beans (longest branches) and for keeping herbs and cut flowers from encroaching onto the paths around your plot (short flexible clippings).
To create long supports for vegetables, choose straight branches and trim off all the side branches and twigs to the main stem. You will need around 6 – 8 to create a wigwam or as many as you can fit into your bed to create an A-frame or X-frame. Here is a short 2 minutes video from the Middle-sized Garden on how to do this yourself to create herb and flowering plant supports. They can also be used for a couple of years before they need replacing.
What to do with … weeds
1. Weed Soup

Fill a bucket with water and continue to add weeds not suitable for your compost. Make sure to cover with a lid to aid the decomposition process and ensure that the weeds stay submerged. Over time they will rot down into a ‘weed soup’ and this is also a quicker method than traditional composting for tough weeds such as brambles. Once the weeds have rotted you can siphon off the rich liquid fertiliser to use as food for your crops or alternately add it to your compost. If you have lots of weeds water butts also work well for this and you can siphon off the liquid soup using the tap.
2. Hot composting
This is a method of composting where material is kept heated to speed up the decomposition process with the aid of microbial activity. You can read all about it in this Guardian article and it is possible to recreate a hot compost at your own plot without the need for an expensive kit.
3. Split compost

Photo credit: Fine Gardening Magazine
If you have space on your plot for multiple compost bins then you can separate these for different purposes. One compost can be kept for just weeds, so you effectively us this to rot them down and never use the rotted material on your plot (to avoid the spread of seed). The other composts can be used for whatever you need, a general green waste one and vegetable waste one to create rich compost material.
4. Richmond Council Garden bin

Photo credit: Richmond Council
Finally we would suggest taking any diseased material home with you to put in your Richmond Council Garden Bin, if you are able to subscribe to this scheme. More details are here and a list of what you can include is here (currently you can put in tomato blight and weeds but not Japanese Knotweed or perennial weeds e.g. couch grass, mares tail and bindweed).
What to do with … vegetable, fruit and herb waste
1. Wormery

Photo credit: RHS
I am a big fan of having a wormery but it does take up to a year to get established and therefore requires patience but once it gets going you will be able to produce the richest natural fertiliser for your plot with very little effort. It might be easier to keep your wormery in a sheltered spot of your garden or porch (or shed during winter). It’s even possible to keep them in the house, which is where I keep mine. This way you can keep a regular eye on your worms and feed them kitchen vegetable scraps, which are their favourite.
I’ve had no problems keeping my wormery in the dining room as it does not smell at all. Initially I had some problems with a few fruit flies but this was solved by putting newspaper on the top of the vegetable material in the wormery and this prevents the flies laying their eggs directly on the food waste. The worms also prefer it because it gives them more protection when feeding out of the soil.
Top tips for keeping a wormery:
- Make sure your wormery is kept at a regular temperate, worms out of the soil are more vulnerable to temperature changes
- Do not add too much food, especially at the start. Be prepared to wait up to a year before your first compost and ‘liquid gold’ is ready for use. Don’t add any mouldy food and remove anything that does go mouldy because the worms don’t want to eat it.
- Avoid adding onions, citrus fruits or anything else too acidic or spicy.
- Make sure the wormery does not get too wet or the worms will suffocate. Wormeries should come with a tap to siphon off the fertiliser water.
- Although the worms prefer vegetable kitchen scraps they can eat some weeds. Adding problematic weeds such as bindweed, which can’t be composted by Richmond Council could be a good solution to this once the wormery is established.
The RHS has lots of tips on starting a wormery, as do the main retailers of wormeries in the UK: Original Organics, The Organic Catalogue, Gardening Works and Wiggly Wigglers.
2. Composting
See notes above about this.
What to do with … plastic bags (from compost/manure)
We would first recommend you start creating your own compost (see notes above) so that in 6 months to two years you will have your own continuous supply and no longer need to buy it in bags.
To reduce plastic from composting bags you could organise with a group of other plot holders for a larger delivery of compost brought in a builders bulk bag and use a wheel barrow to transport it to your plot.

Photo credit: Owning an allotment
For existing plastic bags these can be reused for hot composting (see notes above) or suppressing weeds. You can suppress weeds that grow around crops or put over beds during winter by laying them on the soil and keeping in place with stones or bricks.
What to do with … plastic pots

Pots listed for free on an online website.
Non-black plant pots can be recycled in your home recycling collection if your local authorities also accept plastic pots, tubs and trays (Richmond Council does accept these). Some garden centres also offer take back schemes. Pots that are recycled can be turned into very useful items, read about what A Short Walk can do with them.
Alternatively you can offer them to fellow plot holders (leave on bench at main entrance at Hertford Avenue in front of Trading Shed), neighbours or give them away for free on sites such as Freecycle.

Photo credit: Eden Project
It’s good practice to try and not collect too many plant pots in the first place and when you are growing seeds there are alternatives that can be used such as newspaper and cardboard. The Eden Project have a tutorial on how to create these using newspaper. If you plan to make lots of these seedling pots you might want to invest in a ‘Paper Potter’.
You can also buy fibre plant pots, which rot down in the soil quickly, alternatively there are biodegradable plant pots made from natural plant fibres which last around 5 years and take around 9-18 months to break down in a compost.
Finding second hand tools and sheds

You can avoid the cost of buying new tools and a shed for your plot by sourcing secondhand from your local area. To find items people are looking to give away try websites such as Freecycle, Preloved and Gumtree. Spring and summer are the best times to look for these adverts.
If you have any ideas on how to recycle waste from your plot please get in touch: info@eastsheenallotments.com
